 Dávid Bárdos


 My Computer
 Categories
 Network neighborhood
 Degoogling
 Chevron-locked games
 Along the Edge OST
 My Everyday Superpower
 Date Day
 Five Curious Habits of My Poodle
 The Z323 said goodbye
 My very first blog
 Memories Taken by the Heat
 Bombanana!
 Blaugust 2026
 Replacing Instagram: EyeSpace
 Mobile OSes (featuring Fairphone 5)
 Daily sparks - May 2026
 Who knows that you blog?
 How I dash
 I dream of...
 Intersecting interests
 Along the Edge
 My oldest things
 My Phones
 Road 96 - My Journey
 Custom Font in JetBrains Terminal
 Snowfall
 Refactoring: Yeelight GUI
 About Gridranger
 Friendships in my life
 Intro through traits
 Win 3.1 nostalgia
 Video games that made me learn
 Family history
 Random facts about me

The fifth grandmother🔗
When I was little, I knew that everyone has two grandmothers. I had two: one lived in the same town as my famil,y and one lived in the capital.
As I grew older, things got more complicated. It turned out that I had two more. Both of my grandfathers had lost their first wives before I was born. I never met these two grandmothers, but I learned about them from my family. My uncle also wrote a lot about his mother in his books. My mother and her aunt told me stories about my maternal grandmother.
But the title promised five. So who was the fifth? Well, I think family is not defined by blood or DNA. A family is a group of people loving and caring for each other. In this spirit, Auntie Ilonka was also kind of a grandmother to us. She was an elderly lady living next door.
She looked after us sometimes. We could go to her place to play or listen to her stories. She celebrated birthdays and name days with my family, just like my other grandparents.
Her home felt like a fairy tale to my child eyes. She had a way with animals. She baked and cooked on a wood-burning stove. Her heavy, rustic, dark polished wood furniture added to the magic. Her bed was much higher and shorter than ours, as she slept half-sitting up, as was the custom in the old days, and so on.
Of course, as I grew up, I came to understand that these were the humble marks of a simple country life. But with the cleanliness she maintained, the order she kept, and the kind yet firm way she cared about us, it all still felt like a quiet kind of magic hidden in the little house next door.
I still use a pot she once owned. It moved all the way to Finland with me. And she also taught my mom some recipes. One of those is her signature pogácsa.
Pogácsa is a scone-like pastry. You can pronounce it like the Italian focaccia, but with a long 'a' and a short 'tsh,' and, of course, a 'p' instead of an 'f'. The Hungarian word comes from a Slavic language but has the same origin as the Italian flatbread's name, focācius, which means 'baked on a fire' (source).
My mom bakes it when the family celebrates something, so when I baked it on Saturday, it tasted like childhood birthdays.
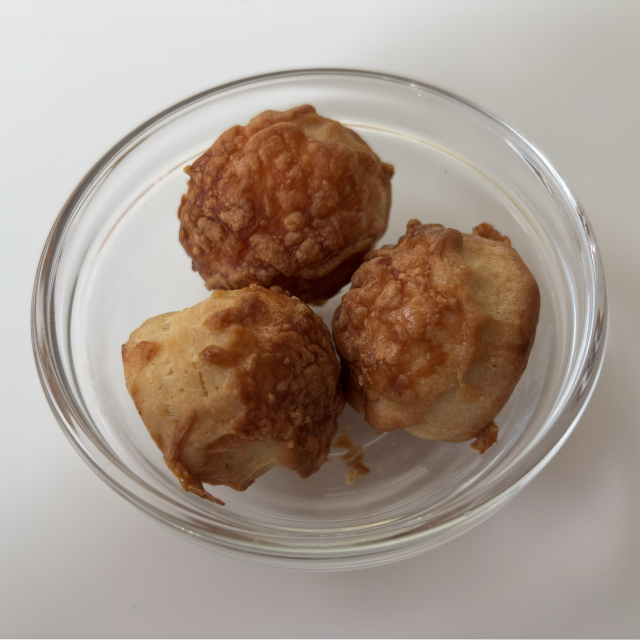
Here comes the recipe. The credit goes to Auntie Ilonka for sharing it with us and to my mother for writing it down for me in such a detailed way that I could reproduce it. You know, I don't have too much experience, and sometimes I feel intimidated when, out of the chaos of ingredients, the uncertainty of kitchen chemistry seems to stare me in the face. All I did was the translation.
Pogácsa🔗
Ingredients🔗
- 600 g of flour
- 1 tablespoon of salt
- 250 g of margarine
- 30 g yeast*
- 150 ml milk
- 1 teaspoon of sugar
- 2 eggs for the dough + 1 egg for brushing
- 3 heaping tablespoons of sour cream**
* If you use instant yeast, you need less. From the brand I used, 11 g instant yeast was equal to 30 g of fresh yeast.
** Different countries have different diary products. The original recipe used the Hungarian tejföl, which is is thick and contains about 20% fat. In Finland, I used crème fraîche (18%) and the dough was perfect.
I also tried using oatmilk instead of regular milk, but the yeast didn't activate properly.
Preparation🔗
Take the margarine out of the refrigerator well in advance so that it reaches room temperature and becomes nice and soft before you start working with it.
For baking, it is best to use two shallow baking trays or cookie sheets. Line them with parchment paper.
Measure out and prepare all the ingredients.
Warm the milk until it is lukewarm (about body temperature). Pour it into a large mug or a small bowl with high sides, stir in the sugar, and crumble the fresh yeast into it. If your kitchen is cool, place the container in a bowl of warm water to help the yeast activate.
In a large mixing bowl, combine the flour and salt. Rub the margarine into the flour until the mixture resembles coarse crumbs. Make a well in the center.
Pour the activated yeast mixture into the well. Add the sour cream and the two whole eggs. Using one hand, mix together the sour cream, eggs, and yeast mixture with a scooping motion, then gradually incorporate the flour and margarine mixture.
At first, work with only one hand. That way, if the dough turns out to need a little more flour or sour cream, you can still use your clean hand to reach for the bag or the spoon. If the ingredients were measured accurately, you probably won't need any adjustments, but much depends on the flour and on the size of the eggs.
Once the dough is coming together and the consistency looks right, lightly flour the center of your work surface and turn the dough out onto it. From this point on, knead with both hands.
To knead the dough, grasp the upper right edge of the dough with your right hand, gently stretch it slightly upwards and outwards, then fold it back over itself and press it down with the heel of your hand. Rotate the dough slightly to the left and repeat the stretch-and-fold motion. Continue in the same way.
At the beginning, the dough will feel rough and lumpy. As you knead, its texture will gradually change. The ingredients become fully incorporated, each fold works more air into the dough, and it becomes smoother, softer, and more pleasant to handle. It is worth repeating this motion at least 200 times. If you have the strength and patience, 300-400 repetitions will produce an even better dough. In practice, each movement takes about one and a half seconds, so the entire kneading process should take no more than about 10 minutes.
When the kneading is finished, shape the dough into a smooth ball. Lightly flour the work surface again over a wide area, place the dough ball in the center, and cover it with the large bowl you used for mixing. Leave it to rise for 1 hour.
Forming and baking🔗
Preheat the oven.
Gently knead the risen dough once or twice to deflate it, then roll it out.
Roll the dough into a round about 1-1.2 cm (½ inch) thick. Using a sharp knife, score the surface. You can make either diagonal parallel lines or a criss-cross pattern, cutting about 2 mm deep.
Cut out the scones using a small round cutter (2-2.5 cm / ¾-1 inch in diameter). Every two or three cuts, dip the cutter in flour to prevent the dough from sticking. If a piece remains inside the cutter, tap its lower edge gently against the work surface to release it.
Try to cut the dough efficiently, leaving as little scrap dough as possible. Each time the scraps are gathered, kneaded together, and rolled out again, they absorb more flour, making the later batches of scones slightly firmer and denser. The fewer scraps you have, the more evenly textured your pogácsa will be.
My own notes: I used a silicone pastry mat instead of a wooden pastry board. That way, I didn't need to add any extra flour while kneading or reshaping the dough. It makes a big difference, as the dough stays softer.
Arrange the scones on the prepared baking trays. For me, it took three trays and yielded 80 scones in total.
Beat one egg thoroughly with a fork, as if making scrambled eggs. Make sure the egg white is completely incorporated, as any remaining thick strands of white can slide off the pastries and drip onto the baking paper. Using a silicone pastry brush, brush the tops of the scones with the beaten egg. You can add grated cheese or sesame seeds on top. One egg is enough for both trays.
My mom's instructions for a gas oven: Bake in a preheated oven at about 180-200°C (350-400°F) for 18-20 minutes. In electric oven, I baked at 180°C (355°F) with fan/convection on the middle rack. 15 minutes was enough.
There is no need to open the oven during the first 15 minutes. After that, check the pastries every few minutes, as oven temperatures can vary. Bake until the tops are golden brown and the bottoms are evenly browned with a light rosy hue.
Leave the scones to cool on the baking trays before transferring them to a serving plate or an airtight container. Don't close the container immediately. If you trap the steam inside, the scones will lose their crisp exterior.
The post's icon is used from iconarchive.com.